Si alguna vez has trabajado con cajas de cambiosYa sea en un tractor que avanza con estruendo por un campo embarrado o en una planta industrial que funciona a pleno rendimiento, los collarines de eje desempeñan un papel discreto pero crucial. Estos pequeños anillos mantienen todo en su sitio, fijando los ejes para que los engranajes y rodamientos no se descontrolen. Instalarlos correctamente no es solo una tarea técnica; es la diferencia entre una máquina que funcione bien y una avería costosa. Así que, pongámonos manos a la obra y veamos cómo instalar collarines de eje en cajas de cambios, paso a paso. Les daré algunos consejos prácticos, basados en años de experiencia.
Ah, y una breve mención antes de empezar: esta guía está inspirada en el equipo de Tebsa, una empresa argentina que fabrica piezas de primera calidad para cajas de cambios desde 1997. Son auténticos: garantía de calidad 100%, talento para soluciones personalizadas y precios accesibles (unos 50% menos que los originales de marcas reconocidas). ¡Comencemos!
¿Qué pasa con los collares de eje?
Imagínate una collar del eje Como un pequeño rebotador para la caja de cambios. Se sujeta al eje, asegurando que nada se deslice donde no debería. En cajas de cambios agrícolas, donde el par motor y la suciedad son la realidad diaria, estos collares evitan que los engranajes se desvíen y mantienen los rodamientos ajustados. Si la instalación falla, el resultado serán ejes inestables, chirridos o, peor aún, un sistema atascado. Sin embargo, bien instalados, son el héroe olvidado de la caja de cambios.
Reuniendo tu equipo
Antes de tocar ese eje, asegurémonos de que tienes lo que necesitas:
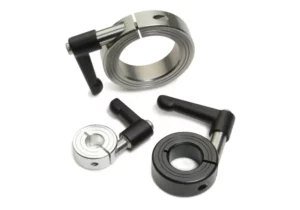
- El collar del eje en sí:Adaptelo al tamaño de su eje y elija un material que se ajuste al trabajo: acero inoxidable para zonas propensas a oxidarse, tal vez latón o acero de aleación para mayor dureza.
- HerramientasUna llave Allen si se trata de un tornillo de fijación, o un destornillador para las abrazaderas. Compruebe qué necesita su collar.
- Artículos de limpieza:Un trapo y un poco de desengrasante para limpiar el eje: la suciedad no es amiga aquí.
- Herramientas de mediciónUna cinta métrica o un calibrador para verificar el diámetro del eje. ¡No se permiten conjeturas!
- Lubricante:Solo un poco si el collar está rebelde, pero no lo ahogues.
Tebsa te cubre las espaldas con una gran variedad de opciones: piensa en aluminio, aleación de zinc, incluso POM o piezas fundidas. Lo ajustarán a tus especificaciones, lo cual es útil si tu caja de cambios es un poco complicada.
El manual de instalación
Aquí te explicamos cómo ponerte el collar como un profesional. Tómate tu tiempo: con las prisas se pueden cometer errores.
Paso 1: Prepárate como si lo sintieras
Toma el trapo y el desengrasante y frota el eje hasta que quede limpio. La suciedad, el aceite o el óxido pueden hacer que el collarín se deslice, y eso es algo que no quieres. Luego, mide el eje con el calibrador. Si mide 25 mm, el collarín también debería medir 25 mm. Una discrepancia aquí es buscarse problemas.
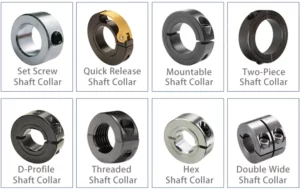
Paso 2: Elige el estilo de tu cuello
Tienes opciones:
- Collares de tornillos de fijaciónEconómico y sencillo. Al apretar un tornillo, se encaja en el eje. Ideal para cargas ligeras.
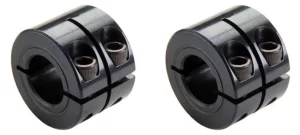
- Collares de abrazadera:Éstos abrazan el eje de manera uniforme, lo que resulta perfecto para cajas de engranajes de trabajo pesado como las de una cosechadora.
- Cuellos divididos: Se instalan o desinstalan sin desmontar la mitad de la máquina. El sueño de cualquier mecánico.
El equipo de Tebsa es experto en su campo. Con procesos como forjado, tallado de engranajes y tratamiento térmico, fabrican collares en serie para todo tipo de aplicaciones, desde prototipos rápidos hasta series completas de producción.
Paso 3: Deslícelo en su lugar
Coloque el collarín en el eje donde debe asentarse, generalmente ajustado contra un engranaje o rodamiento para mantenerlo estable. Si le cuesta trabajo, una pequeña cantidad de lubricante puede ayudar, pero no se exceda. Demasiada grasa solo atrae el polvo.
Paso 4: Bloquearlo
- Estilo de tornillo de fijaciónGira la llave Allen hasta que el tornillo encaje lo justo. Sentirás que se engancha.
- Estilo de abrazadera o divisiónAprieta los tornillos poco a poco, en cruz para que la presión sea uniforme. Intenta unos 10-15 Nm; consulta las especificaciones si las tienes. Apretar demasiado es cosa de principiantes; puede abollar el eje o dañar los tornillos.
He visto a chicos esforzarse demasiado y arrepentirse: lento pero constante se gana esta carrera.
Paso 5: Dale una vuelta
Gire el eje a mano. ¿Se siente suave? ¿Sin vibraciones ni raspaduras? Si algo falla, aflójelo, empuje el collarín y vuelva a apretarlo. Un pequeño ajuste ahora es mejor que una reparación mayor después.
Trucos del oficio
- Elección del material:Si su caja de cambios se encuentra en campos húmedos y salados, opte por acero inoxidable o algo tratado térmicamente.Tebsa Realiza carbonitruración y temple al vacío para endurecer las cosas.
- Acabados elegantesUn collar ennegrecido o con recubrimiento en polvo resiste mejor la corrosión. Además, luce impecable.
- Mantenlo vigiladoLevanta la capucha de vez en cuando para comprobar el desgaste. Detecta un cuello suelto a tiempo y te ahorrarás un dolor de cabeza.
¿Por qué molestarse en hacerlo bien?
Si escatimas en esto, te estás jugando una mala pasada. Un collarín descuidado puede hacer que el eje patine, desajustar los engranajes o paralizar la caja de cambios. Para un agricultor a mitad de la cosecha, eso es una pesadilla. Si la instalación es perfecta, tu máquina seguirá funcionando, ya sea arando surcos o alimentando una línea de producción.
Una palabra sobre Tebsa
Si busca collarines de eje o piezas de caja de cambios que no le decepcionen, Tebsa es una opción que vale la pena considerar. Llevan en el sector desde 1997, con un historial de calidad certificado por la ISO 9001-2015. Su equipo es impecable: ingenieros que le responderán en 24 horas con soluciones personalizadas. Además, tienen todo lo necesario: forjado, torneado, rectificado de engranajes, tratamiento térmico... ¿lo que necesite? ¿Materiales? Elija: acero aleado, fundición a presión, plástico, hierro... lo que necesite su caja de cambios. Y lo mejor: sus precios son aproximadamente la mitad de lo que pagaría por productos de marca, sin sacrificar la fiabilidad.
He trabajado con muchos proveedores a lo largo de los años, y la combinación de habilidad y valor de Tebsa destaca. No solo producen piezas en masa, sino que resuelven problemas.

¿Estás listo para actualizar tu caja de cambios?
Un collar de eje bien instalado es una pequeña ventaja que se traduce en grandes beneficios. Ya sea que esté perfeccionando un prototipo o manteniendo una flota de tractores en funcionamiento, las piezas y la experiencia adecuadas marcan la diferencia. ¿Necesita ayuda para elegir el collar perfecto? Contacte con Tebsa. Le proporcionarán componentes que se ajustan perfectamente y resisten los trabajos más exigentes.
Comuníquese hoy mismo—Su equipo está listo para abordar su próximo proyecto, de manera rápida e inteligente.
¿Cuál es el mejor tipo de collar de eje para una caja de cambios de servicio pesado?
Los collarines de sujeción son la solución ideal para configuraciones de servicio pesado, como las cajas de engranajes agrícolas. Distribuyen la presión uniformemente, lo que facilita el manejo de cargas pesadas sin deslizamientos. Tebsa los fabrica con materiales resistentes como el acero aleado.
¿Puedo instalar un collar de eje sin limpiar el eje primero?
Podrías, pero es arriesgado. La suciedad o la grasa pueden hacer que el collarín se deslice, arruinando la alineación de la caja de cambios. Una limpieza rápida con desengrasante toma dos minutos y te ahorra muchos disgustos.
¿Qué tan apretados debo colocar los pernos en un collar de eje tipo abrazadera?
El par de apriete recomendado es de entre 10 y 15 Nm, pero consulte las especificaciones del collar. Apriete en cruz para mantener un apriete uniforme; una fuerza excesiva puede dañar el eje o los pernos.
¿Por qué elegir a Tebsa para collarines de eje en lugar de otros proveedores?
Cuentan con más de 25 años de experiencia, certificación ISO9001-2015 y precios aproximadamente 50% más bajos que los originales. Además, su equipo personaliza piezas rápidamente (considere opciones de acero inoxidable o con tratamiento térmico) y lo respalda con una garantía de calidad 100%.
¿Cómo sé si mi collar de eje está instalado correctamente?
Gire el eje a mano después de apretarlo. Si se mueve suavemente, sin oscilaciones ni fricción, está listo. Si se siente mal, vuelva a colocarlo y ajústelo hasta que esté bien.